Indonesia Traditional Musical Instruments

| comments

Types of Indonesia Traditional Musical Instruments - This time I'll write more about one of the cultural richness of Indonesia “IndonesiaTraditional Musical Instruments”. Indonesia Traditional Musical Instruments or commonly also referred to the local musical Indonesia very much at all because usually each province has a traditional musical instrument respectively.
Below you can read articles related to the collection of the types of Indonesian Traditional Musical Instruments in the various provinces. Hope can be useful.

Angklung

Traditional Musical Instruments of West Java “Angklung”
Angklung is a musical instrument that is traditionally grown in the West Java. This musical instrument made of bamboo, sounded shaken by the way (the sound caused by impact bodies of bamboo pipes) so as to produce sound.

Bedug

Bedug is a traditional musical instrument which has been used since thousands years ago, which has functioned as a means of communication in ancient times, both in religious rituals and communication between people. Currently Bedug usually used to inform the public when entering the fard prayer times (Islam). Bedug usually used when people make ‘Takbir ‘ around to welcome Eid or Eid al-Adha.

Calung

Judging from its shape, many people equate ‘Calung’ with ‘Angklung’. Although almost the same, but the way the instrument sounds very different. Angklung that sounds just shaken out, while the way of beating the Calung is a way to hit the poles.

Gamelan

Gamelan comes from the Javanese, which means hitting or beating. Some of the provinces are still wearing gamelan on traditional events at the East Java, Central Java and in Bali. Gamelan is also increasingly popular at the time used for the very popular comedy shows on television, namely ‘Opera Van Java’ (OVJ).

Kacapi

Kacapi very popular musical instrument among the Sundanese and used when events related to culture.

Kolintang

Kolintang musical instrument is a musical instrument originally from Minahasa, North Sulawesi. Kolintang name comes from the Minahasa people in his voice: tong (low tone), ting (high tone) and tang (normal tone). In the local language means, the invitation "Let's do TING TANG TONG" is: "Mangemo kumolintang". Invitation was eventually turned into words kolintang for easy spelling by the community.

Pereret Pengasih-asih

Pereret pengasih-asih is a traditional musical instrument from Jembrana, Bali. The musical instrument similar to a trumpet, but made of wood are shaped in such a way that ultimately issue sounds like a trumpet.

Rebab

Rebab musical instrument originally came from Arabia. Early entry into Indonesia around the 8th century when Arab merchants trading to initiate the invasion of some coastal areas of Sumatra and Java coast. Rebab musical instrument is a stringed instrument consisting of two or three pieces of string.

Rebana

Rebana musical origins are from the Arabian Peninsula as well as Rebab. Rebana musical instrument usually used in Islamic art breathe like ‘Hadrah’ or while reading shalawat burdah.

Saluang

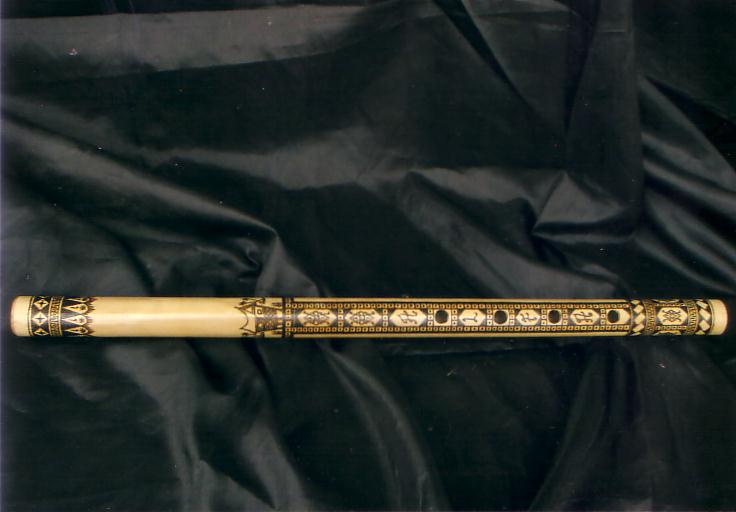
Salang is a musical instrument traditional Minangkabau people of West Sumatra. Musical instrument is a wind instrument similar to flute musical instruments, but more modest manufacturing by punching holes in a thin bamboo or commonly referred to by the Minang the gutter as much as 4 holes.
Sasando

Sasando is a traditional musical instrument which comes from Rote island of Nusa Tenggara Timur. Sasando itself comes from the word Sari (picking) and Sando (vibration) which when combined have the meaning vibrate when plucked. Sasando played with two hands from the opposite direction, left to right and right to left. The left hand plays the melody and bass, while the right hand plays accord.

Sampek

Sampek is a traditional musical instrument from Borneo, commonly used by the Dayak tribe. This instrument is made from various types of wood. However, the most commonly used materials are wood arrow, lime wood, and ironwood and are traditionally made. Making process could take weeks and weeks. Made with 3 strings, 4 strings and 6 strings. Sampek usually be engraved in accordance with the wishes of the maker.

Talempong

Talempong is a traditional musical instrument which comes from the Minangkabau, West Sumatra. These instruments are included in the percussion instruments like gamelan in Java. Even the shape was also almost the same as the gamelan. Currently available in the community Talempong mostly made of brass although there is also Talempong made of wood and stone. Talempong usually circular with a diameter of 15 to 17.5 inches, there is a hole on the bottom whereas on the top there is a prominent traffic circle five inches in diameter as a place to hit.

Tambo

Tambo is a musical instrument that originated from Aceh. How to use this tool just like Tambour is by way of being hit. Formerly a traditional tool is used as a sign upon entering the fard prayer times.

Triton

Triton is an instrument that is blown way is to use. Traditional musical instruments are from Papua. This instrument is scattered on the coast in Papua and was used as a communication tool and as a call to others.

Traditional Music Instrument Tifa

Tifa traditional musical instruments including percussion type. Tifa made from a piece of wood that its contents removed and the edges covered one side, and usually cover used deer skin that has been dried to produce a good sound and beautiful.

Trumpet Reog


Reog trumpet is a traditional musical instrument which comes from the Ponorogo, East Java. This instrument is commonly used as a companion when the show Reog Ponorogo. This instrument is included in this type of wind instrument.

Sequence

| comments

There are different kinds of sequences that we can practice and memorize. This is very useful later for improvisation and even to play the melody.
For this page, I will always update to the latest sequence. All of the following sequences were trained with a slow tempo first, then start accelerating. One thing to keep in mind that "Speed is important but not absolute". Then trained in ascending (up) and descending (down). Learn one by one from each point below. Once memorized and then proceed to the next point
Let's get started...

1-2 - 3 - 4-5 - 6 - 7-1
Do - re - mi - fa - sol - la - he - do

123 (do, re, mi) - 234 (re, mi, fa) - 345 (mi, fa, sol) - 456 (fa, sol, la) - 567 (sol, la, si) - ff.

1234 (do, re, mi, fa) - 2345 (re, mi, fa, sol) - 3456 (mi, fa, sol, la) - 4567 (fa, sol, la, si) - ff.

13 (do, mi) - 24 (re, fa) - 35 (mi, sol) - 46 (fa, la) - 57 (sol, si) - ff.

21 (re, do) - 32 (mi, re) - 43 (fa, mi) - 54 (sol, fa) - 65 (la, sol) - ff.

16 (do, la) - 27 (re, si) - 31 (mi, do) - 42 (p, re) - 53 (sol, mi) - 64 (la, fa) - ff.

67 (la, si) - 56 (sol, la) - 45 (fa, sol) - 34 (mi, fa) - 23 (re, mi) - 12 (do, re) - ff.

123 (do, re, mi) - 1234 (do, re, mi, fa) - 234 (re, mi, fa) - 2345 (re, mi, fa, sol) - ff.

12 343 (do, re, mi, fa, mi) - 23 454 (re, mi, fa, sol, fa) - 34 565 (mi, fa, sol, la, sol) - ff.

321 (mi, re, do) - 432 (fa, mi, re) - 543 (sol, fa, mi) - 654 (la, sol, fa) - 765 (si, la, sol) - ff.

4321 (fa, mi, re, do) - 5432 (sol, fa, mi, re) - 6543 (la, sol, fa, mi) - 7654 (si, la, sol, fa) - ff.

671 (la, si, do) - 567 (sol, la, si) - 456 (fa, sol, la) - 345 (mi, fa, sol) - 234 (re, mi, fa) - ff.

“Marcus Miller” Fender Jazz Bass

| comments

Fender Marcus Miller Jazz Bass is a signature of Marcus Miller who was a bass player known for his slap and groove. this bass body is made of ash wood. This bass can be active or passive bass.
For those fans of Fender Jazz Bass, certainly have ever felt the greatness of the bass. With a good, clear tone and neck with "C Shape", which greatly facilitates the bass player plays a bassline.. Here are the specs of this bass guitar.


SPECIFICATIONS:
  • Neck: "C" Shape
  • Number of Fret: 20
  • Fret Size: Medium Jumbo
  • Fret length: 86.36 cm
  • Nut Width: 38.1 mm
  • Headstock: Artist Signature
  • Truss Rod Nut: Bullet Style
  • Pickup Bridge: Vintage Jazz Bass ® Single-Coil Pickup (Bridge)
  • Neck Pickup: Vintage '75 Jazz Bass ® Single-Coil Neck Pickup
  • Control: Volume 1. (Neck Pickup), Volume 2. (Bridge Pickup), Tone 1. Active Bass Boost / Cut, Tone 2.
  • TrebleBoost / Cut
  • Bridge: Leo Quan Badass ® II
  • String Nut: Synthetic Bone
  • Pick Up Cover: Chrome Pick Up Cover
  • Switching: Active / Passive Mini Toggle Switch


Thus the specification of the Fender Marcus Miller Jazz Bass. this bass is worth to try and collected. we do not have much difficulty in setting equalizer  to get a good tone from this bass. These bass strings are available in 4 and 5 strings.

Knowing the Truss Rod function and how to adjust it.

| comments

If we really love Bass Guitar, we must learn the knowledge of the Bass Guitar. One of them will be discussed are the various Truss Rod and how to adjust it. Often we find a crooked neck. Crooked neck can be caused by various factors. Due to the weather, the wood can bend the neck, can also be caused due to a lack of good quality wood, which is easily bent due to the voltage of the string, the storage in the misplacement of Bass, etc... Truss Rod cannot be seen directly, because it is embedded in the timber neck. Function of the Truss Rod is to adjust the curvature of the neck. So if the neck does not fit the curvature, can be adjusted by Truss Rod. In order to more clearly we can see different types and shapes of the Truss Rod on the image below:


In a Bass Guitar, there is a hole to adjust the Truss Rod. There are hidden (usually covered with mica or plastic) and also there are visible. The location is also not the same. There are at the end of the neck to the head and some are at the end of the neck to the bridge. This adjustment can be done by one of the key "L" or also with a screwdriver. Depending on the type of Truss Rod itself. We can see in the image. 


To adjust the Truss Rod is advisable that loosen the strings first. Then Truss Rod set. If the neck feels convex then Truss Rod adjustment carried out in a clockwise direction. When the neck was concave then Truss Rod adjustment made against clockwise. This adjustment must be done carefully. Do it slowly, because it is usually to turn the truss rod is a bit harsh. Rotate a little and then left to stand for about 30 minutes, then the neck can be checked again the curvature (but previously tighten the strings should be first). Can be seen from the neck itself, nor seen from the distance between the strings to the freeboard. Can also be done with a special tool with a neck string gauge distance. When the felt has not been fitted, then the adjustment carried out again slowly. Repeat these steps until the neck to your taste.


Left Hand Technique (Bass / Guitar)

| comments

LEFT HAND TECHNIQUE

A. HAMMER ON (H)
This technique is played by the left finger tapping on the fret board, sounded the right index finger and then with the left hand first finger is still pressing on the fret board, the other left hand fingers hit the fret board (with a higher tone) without pronounced with right index finger.
The symbol of this technique is the "H".
Below is an exercise of the Hammer On.
--- | - 1 - | --- | - 3 - | --- | ---- strings 1
--- | - 1 - | --- | - 3 - | --- | ---- 2 strings
--- | - 1 - | --- | - 3 - | --- | ---- 3 strings
--- | - 1 - | --- | - 3 - | --- | ---- 4 strings
Train strings sequentially starting from 1 up to 4 strings. Then down again to the string 1. Train with a slow tempo first. Then the tempo is brought forward. How quickly the tempo of your day, try to even faster tomorrow. Here is a form of fingering can be trained:
1: finger
2: Central
3: Sweet
4: little finger
Training with a combination of finger:
1-2 2-3 3-4
1-3 2-4
1-4

2. PULL OFF (PO) 
This technique is the opposite of the Hammer On technique. Press the strings with fingers left: middle, or a little sweet (written with blue numbers). Then sounded, then the first left finger is lifted and the second left fingers press the strings with a lower tone is sounded again without the right index finger (written with red numbers).
--- | - 1 - | --- | - 3 - | --- | ---- strings 1
--- | - 1 - | --- | - 3 - | --- | ---- 2 strings
--- | - 1 - | --- | - 3 - | --- | ---- 3 strings
--- | - 1 - | --- | - 3 - | --- | ---- 4 strings
Practice with a combination finger on the left as exercises Hammer On.

3. HAMMER ATTACK (HA).
This technique is played by pressing a finger on the fret board with the left-enough energy to produce a tone is sounded by hand without the right. Train your fingers to combine your left until your left hand to feel quite tired.

4. HAMMER CROSS.
Use your left finger to press the fret board, then sounded the right index finger (written with blue numbers), then the second left finger ring the other strings with Hammer Attack techniques (written with red numbers).
--- | --- | --- | - 3 - | --- | ---- strings 1
--- | --- | --- | --- | --- | ---- 2 strings
--- | - 1 - | --- | --- | --- | ---- 3 strings
--- | --- | --- | --- | --- | ---- 4 strings
Train your fingers to combine, with different strings, and then try to run toward the chromatic bass body.

5. SLIDE (/ s)
This technique is used by the left finger pressing a note on the fret board, then sounded the right index finger, then the left finger (while still pressing the strings to the fret board) is shifted towards the body or toward the head in accordance with the intended tone.
--- | --- | --- | --- | --- | ---- Strings 1
--- | --- | --- | --- | --- | ---- 2 strings
--- | --- | --- | --- | --- | ---- 3 strings
--- | - 1 - | --- | - 3 - | --- | ---- 4 strings
======>
S

6. Vibrato
This technique is played with one finger to press the strings to the left of the fret board and sounded, then the string is bent vertically upward and down repeatedly with rapid. The resulting sound is the sound of the waves.

7. Vibrato SHAKE
This technique is played by the left fingers press the strings to the fret board and sounded, and finger plays slide techniques to the right out of the first fret then slide back into the first fret and then out to the left of the first fret. This process is done quickly and repeatedly. The technique is good when played solo with the Blues scale.

8. BEND
This technique is played by the left fingers press the strings to the fret board and sounded, then the finger to bend the strings to the head or toward the feet while holding down the strings. This technique is easier to do when the three left fingers press the strings are equal then bend them. Easier if done with the left thumb and three fingers gripping the neck press the strings are equal then bend them. The result is the first tone will rise to semitones or even whole tone.

9. Thrill
this technique is played by Hammer On technique and the technique alternately Pull Off quickly. Right index finger only once rang the strings. You must find the right moment to do this technique. The resulting sound is the voice fluctuates rapidly, giving rise to a wave effect.

10. Harmonic
the technique is done by attaching (without pressing) the strings at certain points on the fret board. In order to obtain a clearer harmonic sound, place your right hand closer to the bridge. The technique is much in use to tune- bass strings. Can also be played on a bass solo moments.

11. Barring
the technique is performed by pressing a few strings by using only one finger. (Usually combined with a double stop or raking techniques). This technique is useful to speed up the fingering in playing a bass line.

12. MUTE LEFT HAND
This technique is useful to stop the sound by placing the fourth finger of the left to the fret board without suppressing it, so just touch it.

13. GHOST NOTE LEFT HAND
The technique is performed by index finger across the three strings with the touch without pressure, then the third left finger slap to the four strings without producing a tone. A tone will create a tone that is just dead (dead note / ghost note).


Overcoming boredom While Drum Exercises

| comments (2)

One of the problems that will be faced by all the drummers are feeling tired during practice. In the early years, there are several reasons why we may feel bored.
First of all, exercise for beginners requires dedication because it is so elementary. In this level, maintaining the interest becomes a difficult thing. But students who successfully completed the first year of learning means have passed the toughest part. Hardest things to remain enthusiastic. Fortunately, for most of us, youthful passion and help us through the first part.

The next problem usually occurs when the student has developed enough to play the rudiment and basic pattern with a certain skill level. At this point, training and the same pattern can become very monotonous. Although repetition is important for the development of skills, strength, and control, this activity could also be negative. Repetition can be so boring, so loosen the student's determination and interest evaporate.
To overcome this, the student should be exposed to challenging material. Although there are parts that need to be trained many times, but the spirit can be maintained if we always have something new as training material. In this way, repetition of skills developed and mind constantly stimulated with new ideas and materials. This is a nice balance.

Tips to create a song

| comments (2)


These tips in creating a song
1) Make yourself into a variety of heart conditions. If you're sad, it will definitely create a sad song. Conversely, if you're happy is bound to create a happy song.
2) If you want to make love-themed songs, try, you've had experience in dating. It will facilitate you in finding a song would you make. Especially painful experience (betrayed or otherwise), must have seemed in the meaning of the song. You can also get inspiration from other people love stories, just waiting for your creativity.
3) Equally important is your mood at the time. Greatly affect the mood in the manufacture of the song .. If you're a bad mood, better do not always make the song. Guaranteed the song will sound less good.
4) At least have one instrument that can help you. But the most often used by people in general that is the guitar, there also are using the piano. Depending on your tastes and skills where you are.
5) try to sing with a melodious voice, diligent practice in order to have a good voice. If your voice in singing sounds bad, you usually tend to be lazy or hesitant to make the song because it is no longer confident with your ugly voice, and arise earlier assumption "I definitely could not afford".
6) Often rhythmic hum-free (but not too much) and spontaneously, because it could be the start you get the inspiration in finding the tone (arranger) song.
7) If you want to create a song, you definitely have to like the music first. Without it you will have difficulty in the process there will not even arise a sense of want to make the song.

Maybe just this once I can do to assist you in creating your music all its own. Keep the spirit, increase your creativity, and do not easily satisfy. Good luck and good luck ....
 
Support : Creating Website | Johny Template | Mas Template
Copyright © 2011. Free Music Lessons - All About Music - All Rights Reserved
Template Created by Creating Website Published by Mas Template
Proudly powered by Premium Blogger Template